Set
the output parameters.
Repository:
Defines where the output data will be
saved.
![]() Local File.
Local File.
Layer Name: Defines the name to create the output layer.
Press the “Finish” button.
The Raster
Edit operation allows the user
to replace raster data pixel
values.
It
is accessible through:
Raster
Processing > Raster Edit... (list
of all raster layers will be available)
This wizard
consists of the following steps:
On the List of Layers select the raster layer to apply the operation.
Optionally use Filter By Name field giving part of the layer name to help find the layer in the list.
Press Next to go to next step or Cancel to close the dialog.
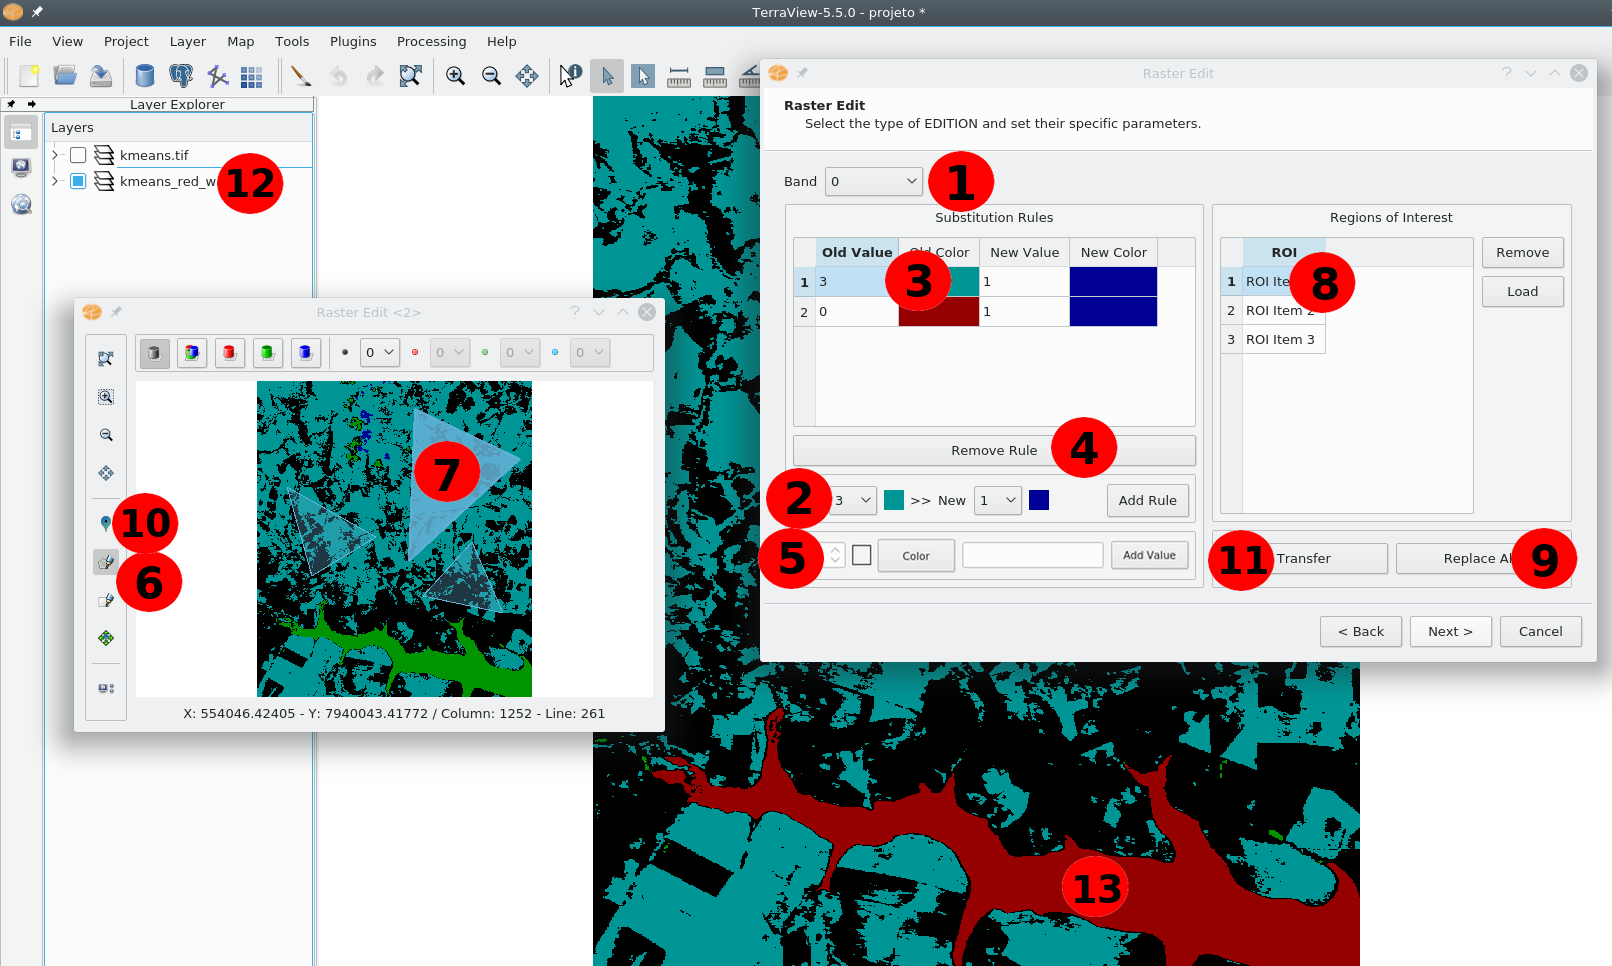
Select de desired input raster band using the Band selection box (Item 1 - See the figure above).
Define values to be replaced:
To create a new rule: Under the “Substitution Rules” rules creation section (Item 2 - See the figure above) set the field “old” to the original raster value to be replaced. Set the field “new” to the new value. Press the button “Add Rule” to add this values to the list. This process can be repeated many times depending on the amount of desired values.
To remove a rule: Under the “Substitution Rules” table (Item 3 - See the figure above) select the desired rule. To remove that rule push the “Remove Rule” button (Item 4 - See the figure above).
Create new substitution values: Optionally new pixel values can be created and used to compose substitution rules. To create a new value select a new valid value from the new value spin box under the new value creation section (Item 5 - See the figure above). Assign a new color to that value pushing the button “Color”. Type a name to be associated to the new value. Finally push the button “Add Value” so that value will be available to create rules.
Define restriction areas:
Create regions of interest (ROIs) to limit where the replacement will occur: To create a restriction area push the “Draw Polygon” (or “Extent Selection”) button on the raster navigator window (Item 6 - See the figure above). Draw the polygon over the raster navigator window (Item 7 - See the figure above). The created areas will be added to the table under the “Regions of Interest” area (Item 8 - See the figure above).
To remove a ROI just select it on the table (Item 8 - See the figure above) and push the “Remove” button.
Load ROIs from an external source: Push the “Load” button under the “Region of Interest” area (Item 8 - See the figure above) and select the external file (the external file must contain only polygon geometries).
To process the entire raster: Push the “Replace All” button (Item 9 - See the figure above). All substitution rules will be applied over all raster pixels.
To process only a specific area segment pixel values: Push the “Point picker” tool under the raster navigator window (Item 10 - See the figure above) and select a raster image segment to process under the image area (Item 7 - See the figure above). All the substitution rules will be applied to that segment.
To transfer (import) a specific area segment pixel values from a external raster: Push the “Transfer” button (Item 11 - See the figure above). Select and visualize the external raster using the Layers tool (Item 12 - See the figure above) under the main window. Select the target raster segment to be transferred by clicking on it under the main raster display area (Item 13 - See the figure above). Important notice: both rasters must be formed by the same pixel data type.
Press the “Next” button.
Wizard Page 3 – Output Raster parameters
Set
the output parameters.
Repository:
Defines where the output data will be
saved.
![]() Local File.
Local File.
Layer Name: Defines the name to create the output layer.
Press the “Finish” button.