 to select a layer that
will be used to generate isolines. Be sure that there is a rectangle
grid (raster) or a triangle grid (TIN) representation.
to select a layer that
will be used to generate isolines. Be sure that there is a rectangle
grid (raster) or a triangle grid (TIN) representation.Isolines are curves that unite surface points having same quota value.
Quota value meaning depends on surface physical magnitude intended to model. Thus to a surface that represents temperature it is obtained isothermal; to atmospheric forecast, isobaric; terrain height, level curves, etc.
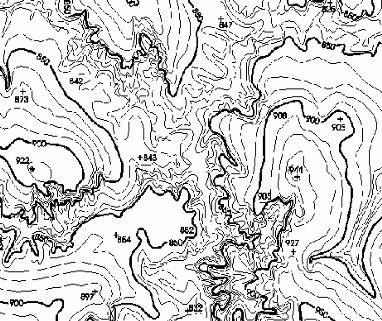
Isolines can be viewed like being a plane projection (x,y) of intersections between the surface and an equidistant horizontal planes family.
The
isovalue curves have some important properties among them: all are
closed unless they intercept map definition border and never cross
each other.
This plugin generates isoline or isovalue curves from the terrain numeric model in a rectangle and triangle grid format using a cell method.
It is accessible through:
PROCESSING → DTM PROCESSING → CREATE ISOLINES...
1. Select Input Layer
to select a layer that
will be used to generate isolines. Be sure that there is a rectangle
grid (raster) or a triangle grid (TIN) representation.2. Set Step:
 to add values in the isolines quote
list. The values will be calculated according to the values
reported. to add value in the isolines quote
list.
to add values in the isolines quote
list. The values will be calculated according to the values
reported. to add value in the isolines quote
list. to remove selected value from list.
 to remove all values from list.
5. Create guidelines: when fixed step is selected, each line in five steps interval will be considered and created as a guideline. It will not be showed in a different style or width in the picture but indicated only in line attributes.
 to select output layer SRS. to select the output
directory
and also inform the new layer name to store the result, or
to select output layer SRS. to select the output
directory
and also inform the new layer name to store the result, or to select
the Data Source
and Inform
the new Layer
Name to store the aggregation result.
to select
the Data Source
and Inform
the new Layer
Name to store the aggregation result.